Eliminate meeting distractions in Mattermost with automatic DND mode
Introduction
Pipedream is a powerful and flexible platform for building and automating workflows. It allows you to connect a wide variety of apps and services, and trigger actions based on events or data from those services. With Pipedream, you can automate all kinds of tasks, from sending emails and texts to updating social media or setting reminders.
One example of how you can use Pipedream is to automatically set Mattermost's DND (Do Not Disturb) mode when a Google Calendar event starts. This can be especially useful if you have meetings or other events that you don't want to be interrupted during. By using Pipedream to automate this process, you can save time and hassle, and ensure that you remain focused and productive during your events.
In this blog post, I'll walk you through the process of setting up this workflow in Pipedream. I'll show you how to set up a Google Calendar trigger, how to set up a Mattermost action, and how to put it all together to create a complete workflow. By the end of this post, you'll be able to automate the process of setting Mattermost's DND mode when a Google Calendar event starts, using Pipedream.
Setting up the accounts
To get started with setting up a Pipedream workflow to automatically set Mattermost's DND mode when a Google Calendar event starts, you'll need to have a few things in place:
-
A Pipedream account: If you don't already have a Pipedream account, you can sign up for one at pipedream.com. It's free to get started, and you can choose a paid plan later if you need more compute time. But Pipedream's free tier is more than enough to get started with this workflow.
-
A Mattermost instance with the right to create a Personal Access Token, which is used to authenticate against the REST API. Your instance administrator can help you with this if you don't have the right to create a Personal Access Token.
-
A Google Calendar account: Finally, you'll need a Google Calendar account to use as the trigger for your workflow.
Once you have these accounts set up, you can follow these steps to connect them to Pipedream:
In Pipedream, click on the "Connections" tab in the left-hand menu.
-
Click on the "Accounts" link, click on the "Connect an app" button, and choose "Google Calendar" from the list of available connections.
-
Follow the prompts to connect your Google account to Pipedream. You'll need to provide your Google login credentials and authorize the connection.
You could also skip this step and set the source up when creating the workflow.
Building the workflow
Click on "Workflows" in the sidebar menu and click on the "New +" button in the top right corner to create a new workflow.
Setting up the Google Calendar trigger
After starting to create a new workflow, the first thing to do is add a trigger. In this case, we'll use a Google Calendar trigger. This trigger will fire whenever a new event is added to a specific calendar.
Select the Google Calendar account you want to use as the trigger, and choose the specific calendar you want to use. You should now also add a timer. Pipedream will use this timer to check for new events every x minutes. I've used 25 minutes because I had problems with the default 15 minutes with very short events. You can adjust this to your needs.
Your trigger should now look like this:
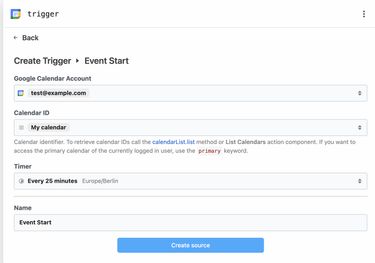
Click on the "Create source" button to move on to the next step.
At this point, you should have a basic Google Calendar trigger set up in Pipedream. When an event starts on the calendar you selected, this trigger will be activated and the workflow will continue to the next step.
Adding a Node action
The next step is crucial for this workflow to work perfectly. Unfortunately the event is not triggered in the exact moment the event starts. This is because Google Calendar doesn't provide a trigger for this. Instead, you'll get a trigger for an event that starts in the next 25 minutes (or whatever timer setting you used). This is not ideal, but it's the best we can do with the current Google Calendar API.
To solve this, we'll use a Node action which will parse the event start and end time to delay the workflow until the event starts. Here is the code we'll use:
export default defineComponent({ async run({ steps, $ }) { const eventStartDate = Date.parse(steps.trigger.event.start.dateTime) const eventEndDate = Date.parse(steps.trigger.event.end.dateTime) const triggerStartDate = Date.parse(steps.trigger.context.ts) const delay = eventStartDate - triggerStartDate if (delay < 0) { return $.flow.exit('The event already started') } $.export('delay', delay) $.export('dnd_end_time', eventEndDate) },})We'll concentrate on the part inside the run function, the rest is normal boilerplate code. The first two lines parse the event start and end time to a JavaScript Date object.
The third line parses the trigger start time to a Date object.
With these variables in place we can now calculate how much we have to delay the workflow to continue at the exact moment the event starts.
Let's subtract the trigger start time from the event start time. This will give us the delay in milliseconds. We'll store this in the delay variable.
If the delay is under 0 we use an early return to exit the workflow in case the event already started.
We need to export the delay and the end time for the event. We'll use these in the next step.
Delaying the workflow
The next step is to delay the workflow until the event starts. To do this, we'll use the Delay action. This action will delay the workflow for a specified amount of time. We'll use the delay we calculated in the previous step.
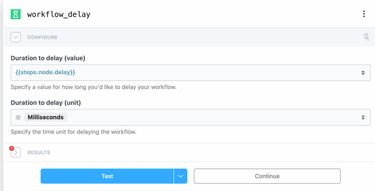
Make sure the set the unit to milliseconds.
Set the DND mode in Mattermost
After you've obtained your personal access token you are ready to build up the HTTP request we are going to make to the Mattermost REST API.
Use the official guide for Personal Access Tokens to obtain your own token. If you can't create a token of your own, you might need to ask your Mattermost administrator to create a token for you or to give you the right to create one.
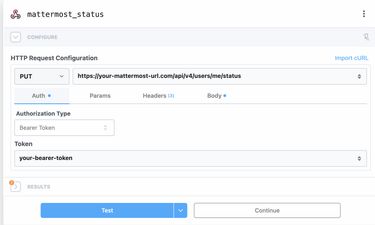
Add the action "HTTP Request" with the method PUT and the endpoint /api/v4/users/me/status with the following body:
{ "user_id": "me", "status": "dnd", "dnd_end_time": "{{steps.node.dnd_end_time / 1000}}"}Note that we set a key of dnd_end_time. This is used to automatically end the DND mode when the event ends.
Your body section should now look like this:

Make sure you use your personal access token in the auth section using the Bearer Token authorization type.
You're good to go! After you've saved the workflow, it will be triggered whenever a new event is added to the calendar you selected. The workflow will delay itself until the event starts and then set the DND mode in Mattermost.
Bonus: Set a custom status with the event name
If you want you can also set a custom status with the event name. To do this, you'll need to add another HTTP request action. This time, you'll need to set the method to PUT and the endpoint to /api/v4/users/me/status/custom. You'll also need to set the body to the following:
{ "emoji": "calendar", "text": "", "expires_at": ""}Note: the API is a bit inconsistent here. The dnd_end_time is in seconds, but the expires_at is in milliseconds. This is why we needed to divide the dnd_end_time by 1000.
I hope this post helped you! If you have any questions, hit me up on X 😊.
You might find these related articles helpful or interesting, make sure to check them out!