How to build a simple JSON API with Netlify functions
I recently built deine-mutter.timkley.dev, a small project which returns a random "your mom" joke. You can use an API like this for all kinds of things. For example, I used pipedream.com to create a weekly workflow which sends a random joke to my teammate. You know, keeping it professional.
Maybe you also need a small API like this and want to get a better grasp how to do this. In this article we'll use Netlify functions to write a simple, globally accessible API that returns some arbitrary value.
First steps
I'll assume you already have an account with Netlify and maybe already published something with it. If not, I recommend the "Add Site" section of Netlify's documentation.
Next, we'll install the Netlify CLI. Although not a hard requirement, I highly recommend installing it, because this will allow you to test your functions locally.
Make sure you have Node installed and run the following command:
npm install netlify-cli -gThis installs the Netlify CLI globally and makes the netlify command available to you.
Next, authenticate yourself using the command netlify login and then we are ready to write our first function!
Simple Hello World! function
Create a new folder for this project and inside it put a file into the folder netlify/functions called hello-world.js. Netlify will look into this folder by default for functions to deploy. After deployment these function will be available at your-domain.com/.netlify/functions/name-of-your-file-without-extension.
Your folder structure should now look like this:
hello-world└── netlify └── functions └── hello-world.js 2 directories, 1 fileFrom the hello-world directory run the following command:
netlify functions:serve. This will locally serve your functions and the output should look like this:
~/Code/hello-world ▶ netlify functions:serve◈ Loaded function hello-world.◈ Functions server is listening on 9999The local server is now available on http://localhost:9999.
Pro-Tip: You can Cmd+Click on the function name to directly open the browser.
If you open the function in the browser you will see an error:
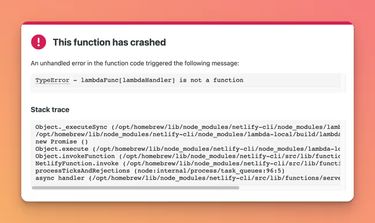
This is because our file is still empty and no function was exported. Every file must export an async handler function, like this:
exports.handler = (event, context) => { // ...}The function accepts two parameters: event and context. The event parameter is an object which contains information about things like which http-method was used, the query-string, etc.
You can read more about the specific contents in the Netlify docs.
The function must return an object which is compatible with the JavaScript Response Object. So, your hello-world example could look like this:
exports.handler = async (event, context) => { return { statusCode: 200, body: 'Hello World!', }}If you now visit the URL http://localhost:9999/.netlify/functions/hello-world you should see Hello World! in your browser. If you pushed these changes to your repo now (and have already configured auto-deploy in Netlify) you could also access this publicly.
Now that you have a working function we can add some useful functionality.
Random quote API
Instead of jokes let's return some Star Wars jokes. Rename your hello-world.js file to star-wars.js and add the following content:
exports.handler = async (event, context) => { const quotes = [ 'I find your lack of faith disturbing.', 'Do. Or do not. There is no try.', 'A long time ago in a galaxy far, far away...', ] const randomQuote = quotes[Math.floor(Math.random() * quotes.length)] const response = JSON.stringify({ quote: randomQuote }) return { statusCode: 200, body: response, headers: { 'Content-Type': 'application/json; charset=utf-8', 'Access-Control-Allow-Origin': '*', }, }}Let's talk about what's happening here:
First, we assign some quotes to an array and get a random quote by using Math.random().
Next, we'll use JSON.stringify() to transform an actual object to a string which we can send with the response.
Lastly, the response will be sent to the browser. There are some additional headers added:
Content-Type: we set the Content-Type to JSON and set the charset to UTF-8 to make sure there are no encoding issues.
Access-Control-Allow-Origin: This header is responsible for defining which origins are allowed to access this endpoint. Since we want our API to be accessible by anyone, we set this to the wildcard character *.
Configuring the URL of our API
The only downside now is: if you deploy this, the URL of that function will be your-domain.com/.netlify/functions/star-wars. If you are only using this function for yourself this might be acceptable. But if you want to provide a public facing endpoint you might want something a little more readable. So we will use the redirect feature to rewrite our endpoint URL.
To configure your redirects, create a netlify.toml file in the root of your project.
In it, you can configure redirects like this:
[[redirects]]from = "/star-wars"to = "/.netlify/functions/star-wars"status = 200Now you will be able to access the API using the URL your-domain.com/star-wars. We set the status to 200 on purpose. By default, Netlify sends a 301 status code for redirects. Since this is a rewrite we will send the HTTP status code 200.
That's it! After deploying you should now be able to access your API by directly visiting your configured URL or by using it with, for example fetch.
You can always have a look at my repo if you're getting stuck.
I hope this post helped you! If you have any questions, hit me up on X 😊.
You might find these related articles helpful or interesting, make sure to check them out!