UniFi network at home: how to easily setup
This small tutorial is directed at people who want a great wireless network experience in their own home but this setup might also be suitable for small businesses with just a few access points.
We recently moved into a new flat. COVID doesn't seem to go away in the near future and our company will offer working completely remote with or without the virus. So having a good internet and network connection was one of my personal priorities. We were lucky enough to get a fiber connection installed just in time for our move.
Our electrician made sure to run LAN cables in every room for maximum flexibility.
But for our laptops and mobile devices, LAN wasn't gonna cut it. We also have two LAN outlets in the ceiling of our hallway, which were deliberately installed there so I could mount two access points.
We already use Ubiquiti devices at my company. Ubiquity has a very good reputation (and rightfully so), so using Ubiquity gear was pretty much set from the start.
Shopping list
My shopping list wasn't big:
- 2x Access Point WiFi 6 Lite
- 2x PoE Injector, 802.3af
- 4x Cat6 Patch cables
Note: depending on your situation you might need more (or less) cables. The access point itself has one outlet (PoE, power over ethernet) and the injector has two. One for LAN intake and one the connect it to the access point.
It took some time for me to get my hands on these because, unfortunately, the access points were sold out whenever I wanted to order.
But after some patience they where back in stock so I pulled the trigger. Ordering in the Ubiquity store was simple and delivery was fast. And somehow much cheaper than buying from a retailer 🤷♂️.
Unpacking
The access points ship with a wall/ceiling mounting kit. The packaging was very thoughtful. All screws where in a small package you could access directly when opening the box. The flap in which it was stored is used to pull out the inner packaging and reveals the access point which itself is covered with a plastic cover for protection. The access point feels very high quality and has a smooth touch surface (I love those!).
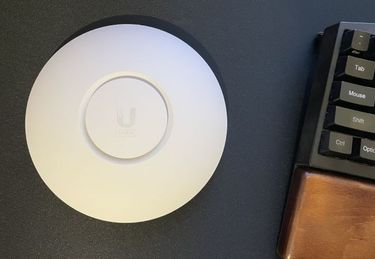
All in all the quality was even better than I expected (and I knew what I was getting into).
Setting up a the Network Controller
Last time I set up the network in my company I used a local controller on my MacBook. Since I forgot to store the backup this resulted in the need to completely reinstall the whole network when I decided to reinstall macOS.
So this time I wanted to setup a controller on a VPS so this won't happen again. Also, it would enable me to access the controller remotely.
After trying some manual setups it turned out that there is a super simple way for setting up everything without any hassle, on any Ubuntu version, with HTTPS enabled without the need to tinker around with correct Java versions.
Get a VPS or similar server
You'll need a (fresh) Ubuntu installation for the next steps. These are the settings I chose for my DigitalOcean droplet:

Although a server with 2 GB of RAM is recommended I didn't have any problems with the smaller option. If you want to make extra sure everything keeps running smoothly better directly select the bigger option for 10$.
I didn't activate the auto backup functionality because I plan to just backup the UniFi Controller settings from time to time.
You could also use Hetzner Cloud or Netcup if those better suit your budget or needs.
To access your network controller make sure to point an A record (like network.your-domain.com) to your servers IP address. This is necessary if you want to access your network controller remotely with Let's Encrypt activated.
Installing the UniFi Network Application
The following steps where successfully tested on Ubuntu 22.04 and with v7.2.92 of the Unifi Controller
Community member AmazedMender16 has provided an easy installation script which takes away all the hassle of installing the network controller.
Basically you'll need to do the following steps:
- Login as root to the provisioned machine
- Download and execute the install and the encrypt script with the following two commands
rm unifi-latest.sh &> /dev/null; wget https://get.glennr.nl/unifi/install/install_latest/unifi-latest.sh && bash unifi-latest.sh rm unifi-easy-encrypt.sh &> /dev/null; wget https://get.glennr.nl/unifi/extra/unifi-easy-encrypt.sh && bash unifi-easy-encrypt.shYou'll find all available script options in the forum thread I linked above, if you provide none yourself the script uses defaults or asks for your input (like which domain name to use).
This process takes about 5 to 10 minutes from start to finish. You can then access your network controller with the domain you specified. The default ports are 8080 for an unsecured connection and 8443 for a secured connection. If you've used the encrypt command above you will be automatically redirected to HTTPS.
You now need to set up a new administrator account which you'll use to access your controller. I used a local account for this since I didn't want to create a Ubiquity account and didn't need one for remote access since now the network controller itself was already remotely accessible.
After you finished these setup steps your network controller is ready to adopt your access points 🎉!
Adopting your access points
You could adopt your access points with the UniFi Network Mobile app available for iPhone and Android if you have a controller in the same network as your access points. But this doesn't work with a remote controller.
UniFi access points use default "inform URL" to announce their presence to local controllers. A remote controller doesn't match the default inform URL, so you'll have to manually set the inform URL for your access points.
I found a great solution in this blog post: How to adopt a UniFi AP with a remote controller
You'll need to:
- Find out the IP address of your access point (this can be done in your router)
- Connect with ssh:
ssh ubnt@ip-address
The default user for a not adopted access point is "ubnt" and the default password is also "ubnt". - After successfully logging in you can set the inform URL with this command:
set-inform https://your-domain:8443/inform
If everything worked you should get a message that your access point was announced for adoption. In your network controller the device should pop up, ready for adaption.
Pitfall when adopting more than one access point
After adopting the first access point I quickly set up a new wireless network with the new access point. This all worked so well that I deactivated the wireless connection in my Fritz Box and swapped everything over to the UniFi network.
The next day I wanted to adopt the second one. It didn't work. I just couldn't get a connection to the device.
Neither a reset, different cables or other IT tricks (like desperately staring at it for 2 minutes) worked.
After setting it up as a standalone access point I updated the firmware to the latest version. In hindsight I can't tell if this was necessary but didn't want to not tell you.
But it still didn't work. The following was my thought process I went through to find the culprit and finally fix it:
- I connected to the standalone access points WLAN
- ssh'ed into the AP using the credentials provided by the UniFi Network App on my iPhone
- was stunned I could log in without any problems
- reset the AP to the factory defaults using
set-default - reconnected to my UniFi WLAN (this will be important)
- tried ssh'ing into the AP using the default user (
ubnt, same password) which didn't work. Seems like the firmware upgrade did nothing. - realising what changed. Yesterday I used the WLAN directly from the router. To set up the first access point. Could this be the reason I can't get a connection?
- reactivated the wireless connection in the Fritz Box and connected to it.
- ssh'ed into the AP. This time it worked!
Now I could just follow the steps outlined above, and now I have 2 working access points 🎉
I hope this post helped you! If you have any questions, hit me up on X 😊.